 HEN vehicles were first used is hard to tell, but we know that they have been used for thousands of years before the Christian era. It is easy to imagine how they looked at that time, when we know how half-civilized people now make wagons.
The first vehicle was only a two-wheeled cart called chariot. Such chariots were used in war and that it was a case of "great cry and little wool" is certain.
HEN vehicles were first used is hard to tell, but we know that they have been used for thousands of years before the Christian era. It is easy to imagine how they looked at that time, when we know how half-civilized people now make wagons.
The first vehicle was only a two-wheeled cart called chariot. Such chariots were used in war and that it was a case of "great cry and little wool" is certain.
The blacksmith used to be the wagon and carriage maker. Now it is only a rare case when a blacksmith makes a carriage, and when it happens most of the parts are bought. In 1565 the first coach was made in England.
Now there are hundreds of factories making wagons and carriages and parts of them for repair use by blacksmiths and wagon makers. It is no use for any blacksmith or wagon maker to compete with these factories. We have neither the means nor the facilities to do it, and have to be content with the repairs they need. The most important repairs are the setting of tire, welding and setting axle stubs.
Wagon tire is often set so that more harm than good is done to the wheel.
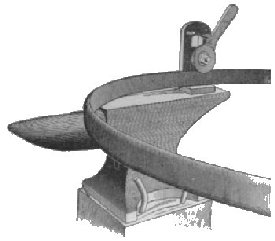
In setting tire the first thing to do is to mark the tire. Many blacksmiths set tires without marking the tire. This is poor work. In order to do a good job the tire should be set so that it is in the same place it had. There are generally some uneven places in the fellows and when the tire is set the first time, it is hot all around and will settle down in these low places. Now, if the tire is not marked and set back in its exact bed, it will soon work loose again, and it is liable to dish the wheel too much as it don't sink into its place, but is held up in some places. Another thing, when a tire is worn so that it becomes thin it will settle down on the outside, especially when the wheel is much dished. Now if you reverse the tire it will only touch the fellow on the inner edge of the wheel, and leave an open space between the fellow and the tire on the outside. When a wheel has bolts every smith knows that it will make trouble for him if he don't get the tire back where it was. In every case take a file or a chisel and cut a mark in the tire near to the fellow plates, cut also a light mark in the fellow. These marks are to be on the inside of the wheel: 1, because it will not be seen on that side; 2, because in putting the tire on, the wheel should be placed with that side up. If there are nails in the tire cut them off with a thin chisel so that it will not mark the fellow, or drive them into the fellow with a punch. Next, measure the wheel with the gauge (the wheel is supposed to be right, not fellow bound nor any spokes loose in the tenon). This done, heat the tire and shrink it. If the wheel is straight give it half an inch draw, sometimes even five-eighths if the wheel is heavy and strong. But if the wheel is poor and dished, do not give it more than one-fourth-inch draw. One tire only with a little draw can be heated in the forge, but if there is more than one tire heat them outside in a fire made for this purpose, or in a tire heater.
There are different ways of cooling the tire. Some smiths have a table in a tank, they place the wheel on the table and with a lever sink both wheel and tire in the water. There are many objections to this. 1, You will have to soak the whole wheel; 2, it is inconvenient to put the tire on; 3, in order to set the tire right, it is necessary to reach the tire from both sides with the hammer; 4, when spokes have a tendency to creep out, or when the wheel is much dished, the wheel should be tapped with the hammer over the spokes. Now, to be able to perform all these moves, one must have, first, a table; this table to be about twelve inches high and wide enough to take any wheel, with a hole in the center of table to receive the hub. On one side you may make a hook that will fall over the wheel and hold the tire down while you get it on. Close to this table have a box 5 ½ feet long, 12 inches wide and 12 inches deep. On each side bolt a piece of two by six about three feet long. In these planks cut notches in which you place an iron rod, run through the hub. On this rod the wheel will hang. The notches can be made so that any sized wheel will just hang down enough to cover the tire in the water. In this concern you can give the wheel a whirl and it will turn so swift that there will be water all around the tire. It can be stopped at any time and the tire set right, or the spokes tapped. With these accommodations and four helpers I have set six hundred hay rake wheels in nine and one-half hours. This was in a factory where all the tires were welded and the wheels ready so that it was nothing but to heat the tires and put them on. I had three fires with twelve tires in each fire. An artesian well running through the water box kept the water cool.
If the fire is not hot enough to make it expand a tire puller is needed. A tire puller can be made in many ways and of either wood or iron. Buggy tire is more particular than wagon tire and there are thousand of buggy wheels spoiled every year by poor or careless blacksmiths. In a buggy tire one-eighth of an inch draw is the most that it will stand, while most wheels will stand only one-sixteenth. If the wheel is badly dished don't give it any draw at all, the tire should then measure the same as the wheel, the heat in the tire is enough.
If the wheel is fellow-bound cut the fellows to let them down on the spokes.
If the spokes are loose on the tenon wedge them up tight.
For a back dished wheel a screw should be used to set the wheel right. Place the wheel on the table front side up. Put wood blocks under the fellow to raise the wheel up from the table. Place a two by four over the hole under the table; have a bolt long enough to reach through the two by four and up through the hub, a piece of wood over the hub for the bolt to go through; screw it down with a tail nut. When the wheel is right, put the tire on. The tire for such a wheel should have more draw than for a wheel that is right.
If a buggy wheel has been dished it can be helped a little without taking the tire off. Place the wheel on the anvil so that the tire will rest against the anvil. Don't let the tire rest lengthwise on the anvil. If you do, the tire will be bent out of shape when you begin to hammer on it. Use the least surface possible of the anvil and hammer on the edge of the tire; the stroke of the hammer to be such that the blow will draw the tire out from the fellow. A tire too tight can be remedied this way.
When bolting a wheel the tire will be out of place unless the tire has been shrunk alike on both sides of the fellow plates. A smith used to setting tires will be able to get the holes almost to a perfect fit. If a tire is too short, don't stretch it with a sharp fuller that will cut down into the tire, when the tire is a little worn it will break in this cut. Draw it out with a wide fuller and smooth it down with the hammer. If it is much too short, weld in a piece. This is easily done Take a piece of iron ¼-inch thick, the width of the tire and the length needed, say about three inches. Taper the ends and heat it to a red heat. Place it on the tire in the fire and weld. This will give material for stretching.
If the wheel has a strong back dish it cannot be set right to stay with the tire alone, as a bump against the fellow is apt to throw the dish back. It is therefore safer in all back dished wheels to take the spokes out of the hole and set them right by wedges in the end of the spokes. These wedges should not be driven from outside in but be placed in the end of the spoke so that they will wedge into the spoke when the same is driven back into its place. Use glue.
When you have the bar of either steel or iron for the tire, first see if it is straight, if not be sure to make it. Next place the tire on the floor and place the wheel on top of the tire, begin in such a way that the end of the fellow will be even with the end of the tire. Now roll the wheel over the tire. If a heavy tire cut it three inches longer than the wheel, if a thin tire, two inches. Now bend the tire in the bender. Measure the wheel with the gauge, then measure the tire; if it is a heavy wagon tire and a straight wheel cut the tire one-fourth of an inch shorter than the wheel. If it is a buggy tire cut it the size of the wheel. In welding these tires they will shorten enough to be the size wanted.
There are many different ideas practiced in welding tires. One smith will narrow both ends before welding; another will cut the edges off after it is welded. This is done to prevent it from spreading or getting too wide over the weld. I hold that both these ideas are wrong. The first one is wrong because when the ends are narrowed down it is impossible to make them stay together until the weld is taken, especially if it is a narrow tire. The second idea is wrong because it cuts off the best part of the weld and weakens it. Some smiths will split the tires, others will rivet them together. This is done to hold the tire in place until it has been welded. There is no need of this trouble, but for a new beginner a rivet is all right.
I shall now give my experience in welding tire, and as this experience has been in a factory where thousands of wheels are made yearly, I suppose it will be worth something to the reader.
When the tire is ready to weld draw down the ends and let them swell as much as they want to. Now let the helper take the end that is to lay on top and pull it towards the floor, the other end to rest on the anvil. This will give that end a tendency to press itself steadily against the lower end. Next place this end on top of the other end. The ends must now be hot enough to allow them to be shaped. You will now notice that the top end is wider than the tire, so is the lower end. The tire is to be so placed that the swelled parts reach over and inside of each other a little. Now give a couple of blows right over the end of the under tire. Next tap the swelled sides down over the tire. This will hold the tire together so that it cannot slip to either side, and the swelled end of the under tire will prevent it from pulling out. If the top end has been so bent that it has a tendency to press down and out a little, the tire will now be in a good shape to weld.
Before you put the tire into the fire, let me remind you of what I have said before about the fire. Many blacksmiths are never able to weld a tire tight on the outside because of a poor, low, and unclean fire. If the fire is too old or too fresh it will not give a good heat for welding tire. If you have a good big fire high up from the tuyer, then you are all right. Place your tire in the fire and proceed as follows: No matter whether it is an iron or soft steel tire, sand is the best welding compound and nothing else should be used; but if you lose the first heat then borax might be used as it will prevent the tire from scaling and burning. When you have the right heat, place the tire on the anvil this way; let the tire rest against the inside edge of the anvil. If the lower end of the tire is allowed to come down on the anvil it will cool off and can never be welded that way. Now hold the tire this way until you have the hammer ready to give the first blow. Then let the tire down and strike the first blows directly on top and over the end of the under end. This is important and if the first blows are not directed to this very place the lower end will be too cool to weld when you get to it. Next weld down the upper end, this done turn the tire on edge and while it is in a welding heat come down on it heavy with hammer, if a buggy tire, and with a sledge and hammer if a heavy wagon tire. Hammer it down until it is considerably narrower over the weld as it will swell out when dressed down. This way the weld has all the material in the iron and the lapped lips will help hold the weld together. A very poor smith can weld tires to stay in this manner. The edges should be rounded off with the hammer and filed to make the tire look the same over the weld as in the iron. If there should be any trouble to weld a steel tire place a little steel borings over the weld and use borax.
A blacksmith in Silver Lake, Minn., working for a wagon maker of that place, when welding a tire failed entirely after half a dozen attempts, and he got so angry that he threw the tire down on the floor with all his might. It happened to crush the wagon makers big toe. This was more than the otherwise good-natured man could stand, and instantly the smith was seen hurled through an open window�the wagon maker attached. Result: separation and law suit. All this because the smith had not read my book.
When a light buggy tire is to be set mistakes are often made in measuring the tire. The tire is too light in itself to resist the pressure of the gauge. The smith tries to go it light and if there is not the same pressure in measuring the tire there was in measuring the wheel, it will not give the same results; and when the tire is put on it is either too tight or too loose. I worked for many years on a tool to hold the tire steady in order to overcome this trouble. The only device that I have ever seen for this purpose before is the anvil close up to the forge, one side of the tire on the forge, the other on the anvil. This arrangement would crowd the smith, roast his back and expose him to ridicule, but it will not help to ruin the tire.
The tool I invented is a tire holder made of cast iron. It consists of a standard or frame with a shank in to fit in the square hole in the anvil; in the standard is a slot hole from the bottom up. On the back of the standard are cogs on both sides of the slot bole. Through this goes a clutch hub with cogs in to correspond with the cogs in the standard. On the outside of the standard is an eccentric lever. Through this lever is a tapered hole to fit over the clutch hub. This lever is tapered so that it will fit different thicknesses, while the cogs and eccentric lever will adjust it to different widths. This device is so cheap that any smith can afford to have it.
Next time you buy a quart of whisky sit down and figure out which will do you more good, my tire holder or the whisky. Figure 7 is an illustration of my holder. This tool is better than an advertisement in your local paper, of which the following story will convince you. A blacksmfth in a prohibition county in a northern Iowa town got into the habit of going over to a Minnesota town for a keg of beer every month. On one of his periodical visits to this place he saw a crowd of men standing around a road grader in the road. As he approached he found that the grader had a serious break-down and the men were just discussing the possibilities of getting the grader repaired in the village shops. One said no smith could do it, another thought they could if they only had tools. "I know a man," said one in the party,
 |
HOLMSTROM TIRE HOLDER |
"that can if any man can, and he has tools I am sure. I was over to his shop the other day to have my buggy tire set, and mind you, he had the slickest tool you ever saw to hold the tire in; I never saw a tool like that before. " "Well," said one, "that has nothing to do with this case." "Yes it has," said the road boss, "my father always used to say, 'A mechanic is known by the tools he uses,' and when a smith has good tools in one line, he has them in another, and I shall give this man a chance."
Our traveling smith had heard enough. This was a temperance and tool lecture to him, he began to think of all the trips he had made to this town. Twelve trips a year, three dollars a trip for liquor and the time lost must be worth two dollars per day. He figured it out and would have turned back if he had not been so close to the place. He took a glass of beer but it didn't taste as usual and he asked for a cigar. With this he returned, and on the road home swore off for good. He bought a tire holder at once to start in with, and by this time he is one of the best smiths in the country, always at his stand ready to do the work brought to him, and his customers now know that he is to be found in his place, with tools of all kinds and a sober hand to use them with. Do thou likewise.
Many of us remember the time when tires were made in sections and nailed on, at this time the wheels were more substantially made, because the tire could not be set as tight as it is now, and the wheel had to be made so that it would stand the usage almost independent of the tire. Our endless tire is a great improvement over the tires made in sections. The wagon tires as they are made now are, I think, as near right is they can be, in regard to size of iron, in proportion to the wheel. But it is different with buggy tires. I hold that they are all made too light to be of any protection to the fellows. I understand the reason why they are made this way, but if a man wants a light rig, let that be the exception and not the rule.

A tire four feet in diameter will expand two inches and a quarter, or three-sixteenths of an inch to the foot. Steel tire expands less. This is the expansion of red heat. If heated less it expands less, but it is no trouble to make the tire expand for all the draw it needs.
A furnace for tire heating comes handy in cities where there is no chance for making a fire outside, but every smith that has room for a fire outside will do better to heat the tire that way. Don't build a tire-heating furnace in the shop if wood is to be used for fuel, because the heat and smoke will turn in your face as soon as the doors of the furnace are opened.
When a worn buggy axle is to be stubbed, proceed as follows: First, measure the length of the old axle. For this purpose take a quarter inch rod of iron, bend a square bend about an inch long on one end. With this rod measure from the end of the bearing, that is, let the hook of your rod catch against the shoulder at the end where the thread begins, not against the collars, for they are worn, nor should you measure from the end of the axle, for the threaded part is not of the same length. Now place your stub on the end of the axle and mark it where you want to cut it off. Cut the axle one-fourth inch longer than it should be when finished. Next heat the ends to be welded and upset them so that they are considerably thicker over the weld; lap the ends like No. 1, Figure 6, weld and use sand, but if the ends should not be welded very well then use borax. These stubs are made of soft steel, and will stand a higher heat than tool steel, but remember it is steel. If the ends have been upset enough they will have stock enough to draw down on, and be of the right length. If this is rightly done one cannot tell where the weld is. Set the axle by the gauge, if you have one, if not, by the wheels.
A gauge to set axles by can be made in this way: When you have set an axle by the wheels so that it is right, take a piece of iron 1 x ¼, six feet long, bend a foot on this about six inches long, with a leg on the other end. See No. 5, Figure 8; the leg to be movable and set either with a wedge or a set screw to fit for wide and narrow track. The gauge to be set against the bottom side of the axle. The pitch to be given a set of buggy wheels should be from one to one and one-half inches. I would recommend one and a half inches. This will be enough to insure a plumb spoke when the vehicle is loaded. It will also insure safety to the rider from mud slinging. By pitch, I mean that the wheels are one and a half inches wider at the upper rim than they are down at the ground. Every smith ought to have a gauge of this kind, it is easy to make and it saves a lot of work, as there is no use of the wheels being put on and an endless measuring in order to get the axle set right.
By gather I mean that the wheels should be from one-fourth to one-half an inch wider back than in front. Don't misunderstand me now. I don't mean that the hind wheels should be wider than the front wheels, I mean that a wheel should have a little gather in front, as they are inclined to spread and throw the
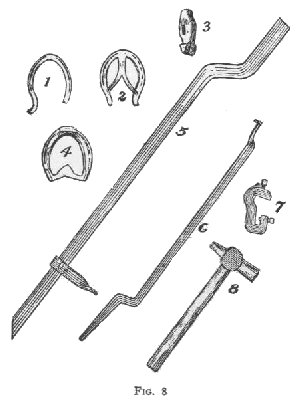
bearing on the nut, while, if they have a little gather, they will run right, and have a tendency to throw the bearing on the collars of the axle. If they do they will run more steady, especially when the axle is a little worn.
A gauge for this purpose can be made like Figure 8, No. 6. This gauge to be fitted to the front side of the axle when you make it. It can be made of 1 x ¼ about three feet long, the forked end to reach the center of the axle. With these two gauges axles can be set right without the wheels.
Chapter 5
Chapter 3
Return to Main Page
© 2000, 2001 by Lynn Waterman